

Mastering Python Basics: Modules, PIP, Virtual Environments, JSON, and Error/File Handling

As part of my third week at the DataraFlow internship program, I was tasked with strengthening my understanding of core Python concepts. The practice set included topics such as Python modules, working with dates, handling JSON, creating virtual environments from the command prompt, installing packages using PIP, and managing errors. This article documents the key lessons learned, the challenges encountered, and the strategies I employed to overcome them.
We’ll cover:
Python modules
Pip and virtual environments
Dates and times
JSON
File handling
User input
Error handling
Each section includes examples with code and explanations. By the end, you’ll not only understand these concepts but also feel confident applying them in your own projects.
Key Lessons
1. Working with Python Modules
A Python module refers to a single .py file that holds code like functions, classes, or variables and can be brought into other programs through import. It is important to note that it is different from a Python package, which is a folder that organizes several related modules and usually includes an __init__.py file to mark the directory as a package. Modules can be used after importing them using the import statement.
For example, in the code below, we imported the math module and used it to find the square root of 144.
# Import the math module
import math

# Calculate the square root of 144
result = math.sqrt(144)
print(result)
Output:
12.0
import module lets you access all the functions of a module, but you must prefix them with the module's name, like math.sqrt(144). Meanwhile, from module import function is used to bring in only specific functions of the module, allowing you to use them directly, like sqrt(144). The latter method is more concise but carries a risk of naming conflicts if multiple modules have identically named functions. For this reason, importing the entire module is often considered a safer practice.
The code example below demonstrates two different ways of using the sqrt() function from Python’s built-in math module to calculate square roots. In the first part, the entire math module is imported using import math, which means you must prefix any function call with math., so math.sqrt(9) returns 3.0. In the second part, only the sqrt function is specifically imported with from math import sqrt, allowing you to call it directly without the math. prefix. This makes the code shorter and cleaner when you only need one function, so sqrt(25) outputs 5.0.
# Import all functions from math module
import math
# Use the sqrt() function by prefixing it with the math module
print(math.sqrt(9))

# Import the sqrt() function from the math module
from math import sqrt
# Use the sqrt() function directly
print(sqrt(25))
Output:
3.0
5.0
2. Pip and Virtual Environments
Pip, or Pip Installs Packages, is Python's official package manager, which allows you to easily install, update, and manage third-party libraries that aren't part of Python's default installation. This saves developers from having to manually download and configure packages.
A Python virtual environment is a self-contained space that isolates a project's dependencies from other projects and the main Python installation. This is important because it prevents conflicts that can arise when different projects need different versions of the same library. By creating a separate environment for each project, you ensure that its required packages are organized, independent, and easily managed.
To create a virtual environment on a Windows computer, open the Windows command prompt, navigate to the folder where you want to create your project, then type this command:
python -m venv myproject
This will create a virtual environment named myproject.To use the virtual environment, you have to activate it with this command:
myproject\Scripts\activate
Once your virtual environment is activated, you can install packages in it using pip. For example, to install numpy in the virtual environment, run:
pip install numpy
To verify that the numpy has been installed:
Open Notepad
Write your Python code to import and use
numpy. For example:
import numpy as np

arr = np.array([1,2,3])
print(arr)
Save the file: Go to File > Save As.
Choose the location where your virtual environment is found but not inside your vitual environment folder.
Set "Save as type" to "All Files": This is crucial to prevent it from being saved as a .txt file.
Name the file with a .py extension: For example,
test.py.Click "Save."
Execute
test.pyin the virtual environment by running:
python test.py
- You can also verify by running
pip list.
The runs are shown in the image below.
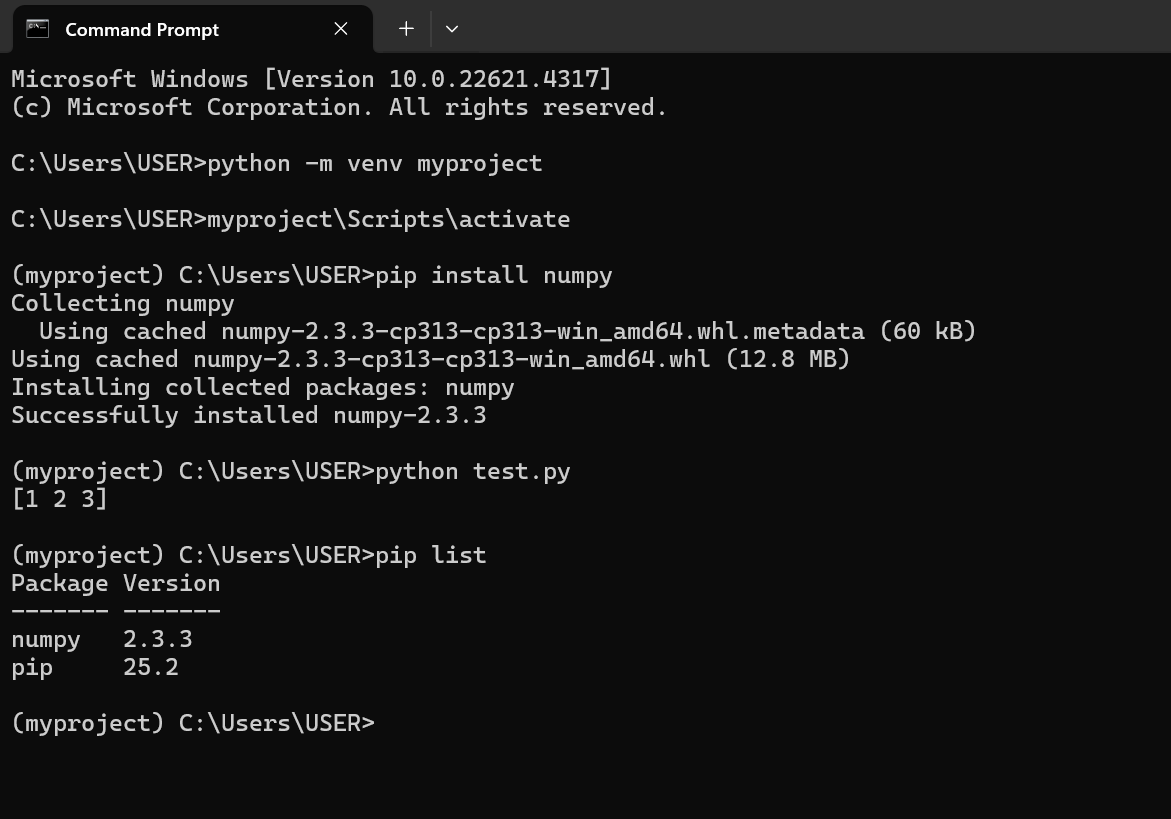
Let’s say you are working on two different Python projects: one is a web scraping project that uses Requests version 2.25, and the other is a data project that requires Requests version 2.32. If you install Requests globally, upgrading it for one project might break the other because they depend on different versions. Virtual environments solve this problem by letting you create isolated workspaces. For example, you can run python -m venv scrape_env for the web scraping project and python -m venv data_env for the data project, then install the required Requests version in each. This way, both projects have the exact library versions they need without conflicts, showing why virtual environments are so important.
To install specific versions of a library, you use the syntax pip install package_name==version_number. For example, the code below shows how to install the Requests version 2.25.
# Install Requests version 2.25
!pip install requests==2.25
When you see !pip in Python code, it usually means the command is being run inside a Jupyter Notebook or Google Colab environment. In these environments, the exclamation mark (!) tells Python to run the command as a shell (terminal) command instead of regular Python code. Since pip is normally a command-line tool for installing Python packages, writing !pip install requests inside a notebook allows you to install libraries directly without leaving the notebook. Without the !, Python would try to interpret pip as a variable or function, which would cause an error.
3. Handling Dates and Times
The datetime module in Python is a built-in library that provides classes and functions for working with dates and times. It allows you to create, manipulate, and format dates and times in various ways. For example, getting the current date and time with datetime.datetime.now(), extracting specific components like year, month, or day, performing calculations such as finding the difference between two dates, or formatting dates into readable strings. This module is particularly useful in real-world applications, such as scheduling tasks and handling time-based data in projects spanning web development to data science.
Running the code below will give you the current date and time in the format year, month, day, hour, minute, second, and microsecond. For example, 2025-09-28 00:23:52.833353.
import datetime

# Get current date and time
date_time = datetime.datetime.now()
print(date_time)
The strftime() and strptime() methods in Python’s datetime module are used for formatting and parsing dates and times. strftime() (string format time) converts a datetime object into a readable string based on a specified format. For example, turning 2025-09-27 23:45:00 into "27-09-2025 11:45 PM" using format codes like %d for day, %m for month, %Y for year, and %H:%M for time. On the other hand, strptime() (string parse time) does the reverse: it takes a date/time string and converts it into a datetime object, as long as you provide the correct format string. For instance, datetime.strptime("27-09-2025", "%d-%m-%Y") creates a datetime object representing September 27, 2025.
Here’s a table of commonly used Python strftime/strptime format codes:
| Code | Meaning | Example Output |
%Y | Year (4 digits) | 2025 |
%y | Year (2 digits) | 25 |
%m | Month (number, zero-padded) | 09 |
%B | Month (full name) | September |
%b | Month (abbreviated name) | Sep |
%d | Day of the month (zero-padded) | 07 |
%A | Day of the week (full name) | Saturday |
%a | Day of the week (abbreviated name) | Sat |
%H | Hour (24-hour clock, zero-padded) | 23 |
%I | Hour (12-hour clock, zero-padded) | 11 |
%p | AM/PM designation | PM |
%M | Minute (zero-padded) | 45 |
%S | Second (zero-padded) | 09 |
%f | Microsecond (zero-padded) | 123456 |
%Z | Time zone name | UTC |
%j | Day of the year (001–366) | 270 |
%U | Week number of the year (Sunday first) | 39 |
%W | Week number of the year (Monday first) | 39 |
%c | Locale’s date and time representation | Sat Sep 27 23:45:09 2025 |
%x | Locale’s date representation | 09/27/25 |
%X | Locale’s time representation | 23:45:09 |
The example code below uses the datetime module to display details about the current date, with a focus on how strftime() formats date and time into readable strings. First, it retrieves the current year directly with .year and the current day of the month with .day. Then, it applies strftime("%B") to return the full month name (e.g., "September") and strftime("%A") to return the full day name (e.g., "Saturday"). Finally, it prints the current year, month, and day in a human-friendly format.
import datetime

# Get current year
current_year = datetime.datetime.now().year
# Get current month
current_month = datetime.datetime.now().strftime("%B")
# Get current day
current_day = datetime.datetime.now().day
# Get current day full name
current_day_full = datetime.datetime.now().strftime("%A")

# Print current year, month and day
print('Current year is:', current_year)
print('Current month is:', current_month)
print('Current day is:', current_day_full, current_day)
Example output:
Current year is: 2025
Current month is: September
Current day is: Saturday 27
Another example code below defines a function that calculates the number of days between two given dates, and it relies on strptime() to correctly interpret the input strings. The function number_of_days_difference() accepts two dates in the format "DD-MM-YYYY". Inside the function, datetime.strptime() is used to parse the string inputs into datetime objects, ensuring Python understands them as actual dates rather than plain text. Once converted, the code subtracts the two datetime objects, which produces a timedelta object. Accessing the .days attribute of this object returns the difference in days as an integer. For example, passing '20-09-2025' and '27-09-2025' will return 7.
import datetime

def number_of_days_difference(first_date, second_date):
  '''
  Calculates the number of days between two given dates in the format DD-MM-YY.
  '''
  # Convert dates to datetime objects
  first_date = datetime.datetime.strptime(first_date, '%d-%m-%Y')
  second_date = datetime.datetime.strptime(second_date, '%d-%m-%Y')
  # Calculate and return number of days difference
  return (second_date - first_date).days

# Call the function
number_of_days_difference('20-09-2025', '27-09-2025')
Output:
7
4. JSON Made Easy
JSON (JavaScript Object Notation) is a data format used for storing and exchanging information in a way that both humans and machines can easily read. In Python, JSON is especially important because it allows seamless communication between different systems, applications, or APIs. For example, when working with web services, data is often sent and received in JSON format, and Python’s built-in json module makes it easy to convert JSON data into Python dictionaries (deserialization) and convert Python objects back into JSON (serialization). This makes JSON a powerful tool for tasks like handling API responses, saving configurations, or transferring data between programs.
When converting Python objects to JSON, it’s important to understand how different Python data types are mapped to JSON equivalents. The json module in Python handles this automatically through the json.dumps() function, but knowing the conversion reference helps avoid confusion.
Here’s a Python to JSON Conversion Reference Table:
| Python Object | JSON Equivalent |
dict | Object |
list, tuple | Array |
str | String |
int, float | Number |
True | true |
False | false |
None | null |
import json

python_object = {
  "name": "Franklin",
  "age": 16,
  "married": True,
  "divorced": False,
  "children": ("Princess","Prince"),
  "pets": None,
  "cars": [
    {"model": "BMW 230", "mpg": 27.5},
    {"model": "Ford Edge", "mpg": 24.1}
  ]
}

# Convert Python object to JSON string
json_string = json.dumps(python_object)
print(json_string)
Output:
{"name": "Franklin", "age": 16, "married": true, "divorced": false, "children": ["Princess", "Prince"], "pets": null, "cars": [{"model": "BMW 230", "mpg": 27.5}, {"model": "Ford Edge", "mpg": 24.1}]}
The example code above demonstrates how to convert a Python object into a JSON string using the json module. A Python dictionary named python_object is defined, containing different data types such as strings, integers, booleans, a tuple, None, and a list of nested dictionaries. The json.dumps() function is then used to serialize this dictionary into a JSON-formatted string, which makes it suitable for storage or transmission (e.g., sending through an API). Notably, Python-specific types are automatically converted into their JSON equivalents. For instance, the tuple ("Princess", "Prince") becomes a JSON array, True becomes true, False becomes false, and None becomes null, etc.
Attempting to load a JSON file with invalid JSON content will result in a JSONDecodeError. This error signals that the file's contents don't adhere to the correct JSON syntax. This example code below illustrates what happens when invalid JSON syntax is used in a file. First, it creates a file named franklin.json and writes a JSON-like string that incorrectly contains a Python tuple (1, 2, 3) instead of a valid JSON array [1, 2, 3]. Since tuples are not part of the JSON standard, this makes the file content invalid JSON. When the file is later opened in read mode and json.load(f) is used to parse it, Python attempts to interpret the content as JSON but fails, raising a JSONDecodeError.
import json

# Create a JSON file that contains a tuple
with open('franklin.json', 'w') as f:
  f.write('{"mytuple": (1, 2, 3)}')

# Open the file in read mode and load the JSON content. This will display the JSONDecodeError
with open('franklin.json', 'r') as f:
  loaded_data = json.load(f)
  print(loaded_data)
5. File Handling
File handling refers to the way Python programs interact with files stored on your computer. Files are essential for storing data permanently, unlike variables that only exist while a program runs. Python provides a built-in way to create, read, update, and delete files, making it possible to manage data beyond temporary program execution. At the core of file handling is the open() function, which allows you to access a file by specifying its name and the mode of operation.
Here’s a table showing the file modes of operation in Python:
| Mode | Description |
'r' | Opens a file for reading (default). The file must exist, otherwise it raises an error. |
'w' | Opens a file for writing. Creates a new file if it doesn’t exist, but overwrites the file if it does. |
'a' | Opens a file for appending. Creates a new file if it doesn’t exist, but adds new data at the end if it does. |
'x' | Opens a file for exclusive creation. If the file already exists, the operation fails. |
'b' | Opens the file in binary mode (used for non-text files like images, audio, or executables). |
't' | Opens the file in text mode (default). Used for reading and writing text files. |
'r+' | Opens a file for both reading and writing. The file must exist. |
'w+' | Opens a file for both writing and reading. Creates a new file if it doesn’t exist, but overwrites if it does. |
'a+' | Opens a file for both appending and reading. Creates a new file if it doesn’t exist. |
Once a file is opened, operations like reading (read(), readline(), readlines()) or writing (write(), writelines()) can be performed. After finishing, the file should always be closed using the close() method to free up system resources and ensure data integrity. However, a more reliable and pythonic way is to use the with statement, which automatically closes the file after the block of code is executed, even if an error occurs.
The example code below demonstrates how to append text to a file and then read its contents using Python’s file handling. The first block uses a with statement to open the file franklin.txt in append mode ("a"), which means if the file exists, new content will be added to the end without deleting the existing data, and if it doesn’t exist, it will be created. Inside the block, the line "Franklin is smart" is written to the file. After this, the file is opened again, but this time in the default read mode ("r"), and the read() method is used to retrieve and display the entire content of the file. This example shows the convenience of the with statement in managing files automatically (closing them after use).
with open("franklin.txt", "a") as f:
    f.write("Franklin is smart")
# Open and read the file after appending:
with open("franklin.txt") as f:
    print(f.read())
Output:
Franklin is smart
6. User Input and Interactivity
User input in Python refers to the process of collecting data directly from the user during program execution. User input is important because it makes programs interactive, allowing them to adapt based on what the user provides. It is commonly used in applications like calculators, games, quizzes, or any software that requires dynamic information. This is achieved using the built-in input() function, which pauses the program and waits for the user to type something into the console. Whatever the user enters is captured as a string by default, even if they type numbers. Since all input is treated as a string, you will need to convert the input into other data types when necessary. For instance, if a program asks for the user’s age, the input should be converted into an integer using int() or into a floating-point number using float() if decimals are expected. This ensures that the data can be used in arithmetic operations or comparisons.
For example. the code below demonstrates how user input can be used to create an interactive program that calculates a person’s age. It begins by prompting the user to enter their birth year using the input() function, which collects input as a string. Since numerical calculations are needed, the input is converted into an integer with int(). The program then retrieves the current year using datetime.datetime.now().year and subtracts the user’s birth year from it to determine their age.
import datetime

# Enable user to enter their birth year
user_birth_year = int(input("Enter your birth year: "))
# Get current year
current_year = datetime.datetime.now().year
# Calculate user's age
user_age = current_year - user_birth_year
# Display user's age
print(f"You are {user_age} years old.")
Example output:
Enter your birth year: 2010
You are 15 years old.
It is also important to validate and handle user input properly (e.g., using error handling with try-except) to avoid crashes when users enter unexpected values. This makes input handling a key part of building robust and user-friendly Python applications. For example, the code below shows how error handling can be combined with user input to make programs more robust. It uses the try-except block to catch potential errors when the user is asked to enter an integer. Inside the try block, the program prompts the user for input and attempts to convert it into an integer using int(). If the user enters something that cannot be converted to an integer (such as letters or symbols), Python will raise a ValueError, and the except block will execute instead, printing the message "Invalid input. Enter an integer." This ensures that the program does not crash due to invalid input and provides clear feedback to guide the user.
try:
  # Enable user to enter an integer number
  int(input('Enter an integer: '))
except:
  # Display error message if user enters a non-integer number
  print('Invalid input. Enter an integer.')
Example output:
Enter an integer: 3.4
Invalid input. Enter an integer.
7. Error Handling with Try/Except
Error handling in Python refers to the process of managing unexpected issues or exceptions that occur when a program runs, so that the program does not crash abruptly. Errors can arise from many situations like dividing by zero, trying to open a non-existent file, or converting invalid user input into a number. Instead of letting these errors stop execution, Python provides a structured way to anticipate and respond to them using exceptions. This makes programs more reliable and user-friendly.
The main tool for error handling is the try-except block. Code that might cause an error is placed inside the try block, and if an error occurs, control is immediately passed to the except block, where the error can be handled gracefully, for example, by showing a custom error message or providing an alternative solution. You can also catch specific errors (like ValueError, ZeroDivisionError, or FileNotFoundError) instead of catching all errors, which makes debugging easier and error handling more precise.
For example, the code below demonstrates how Python handles errors gracefully using a try-except block. Inside the try section, the program attempts to convert the string 'abc' into an integer with int('abc'). Since 'abc' contains letters and not numeric characters, this operation raises a ValueError. Instead of the program crashing, the error is caught by the except block, which then executes the custom message "Cannot convert string to integer." This ensures the program continues running smoothly and provides a clear explanation of what went wrong.
try:
  # Try to convert 'abc' to integer
  int('abc')
except:
  # Error message to display since string cannot be converted to integer
  print('Cannot convert string to integer.')
Output:
Cannot convert string to integer.
Additionally, Python provides else and finally clauses to extend error handling. The else block runs if no exception occurs, while the finally block always runs, regardless of whether an error happened, often used for cleanup actions like closing files or releasing resources.
For example, the code below demonstrates the full flow of error handling in Python using try, except, else, and finally. The try block asks the user to input a number and attempts to convert it into an integer. If the input is invalid (e.g., letters instead of digits), a ValueError occurs, and the except block prints a friendly error message. If no error occurs, the else block runs, confirming the valid number entered. Regardless of whether an error happened or not, the finally block always executes, printing "Program execution complete."
try:
    # Ask the user to enter a number
    number = int(input("Enter a number: "))
except ValueError:
    # Handle the case where input is not an integer
    print("Invalid input! Please enter a valid integer.")
else:
    # Runs only if no error occurs in the try block
    print(f"Great! You entered the number {number}.")
finally:
    # Runs no matter what happens above
    print("Program execution complete.")
Example output:
Enter a number: f
Invalid input! Please enter a valid integer.
Program execution complete.
Challenges Encountered
Here are the challenges I encountered while practising these Python concepts:
- When I first wrote a program to take a user’s birth year as input and calculate their age, I hardcoded the current year by subtracting the birth year from 2025 (i.e.,
2025 - user_birth_year). However, I quickly realized that this approach wasn’t dynamic because the year changes over time. To fix this, I useddatetime.datetime.now().yearto automatically fetch the current year, making the program accurate and adaptable in any year. The updated code is shown below.
import datetime

# Enable user to enter their birth year
user_birth_year = int(input("Enter your birth year: "))
# Get current year
current_year = datetime.datetime.now().year
# Calculate user's age
user_age = current_year - user_birth_year

# Display user's age
print(f"You are {user_age} years old.")
- When writing a program that asks the user 5 random math questions (addition, subtraction, multiplication, division) and keeps score of correct answers, I initially did not gracefully handle division by zero to prevent runtime errors during the math quiz. The code is shown below. When a random operation is selected, there’s a chance that the division symbol (
'/') could be chosen while the second random number (number_2) is zero. Since dividing by zero would raise a ZeroDivisionError, I had to make the program check for this case before forming the question. To handle this, I ensured that if the operation is division andnumber_2equals zero, the code enters awhileloop that regenerates new random numbers and a new operation until it finds a valid combination where division is not attempted with zero as the divisor. This ensures that every generated math question is mathematically valid and executable byeval(), making the quiz both dynamic and error-free.
import random

# Initialize the score and operations
user_score = 0
operations = ['+', '-', '*', '/']

# Ask five random math questions
for i in range(5):
    # First random number between 1 and 20
    number_1 = random.randint(1, 20)
    # Second random number between 1 and 20
    number_2 = random.randint(1, 20)
    # Enable random selection of operation
    operation = random.choice(operations)

    # Define the math question and handle division by zero
    if operation == '/' and number_2 == 0:
        # If division by zero, generate new numbers and operation
        while operation == '/' and number_2 == 0:
            number_1 = random.randint(1, 20)
            number_2 = random.randint(1, 20)
            operation = random.choice(operations)

    question = f"{number_1} {operation} {number_2}"

    # Get the correct answer
    correct_answer = eval(question)

    # Ask the math questions and update user score, ensuring invalid input is handled
    try:
        user_answer = float(input(f"Question {i+1}: What is {question}?: "))
        if user_answer == correct_answer:
            print("You are correct!\n")
            user_score += 1
        else:
            print(f"Wrong! Correct answer is {correct_answer}\n")
    except ValueError:
        print("Invalid input. Skipping question.\n")

# Display user score
print(f"You got {user_score} out of 5 correct!")
When I first started asking for user input in my programs, I faced the challenge of not explicitly specifying the input data type. By default, Python’s
input()function always returns user input as a string, regardless of whether the user enters numbers, letters, or symbols. This became a problem whenever I needed to perform arithmetic operations, because working directly with string values would either produce incorrect results or raise errors. For example, entering"25"would be treated as text rather than the integer25. To solve this, I had to convert the input into the correct data type using functions likeint()for integers orfloat()for decimal numbers.When I was activating a virtual environment on the Windows Command Prompt, I mistakenly used a forward slash
(/)instead of the required backward slash (\) in the file path. This small mistake caused the command not to work and made it difficult for me to understand why the environment wasn’t activating. Since Windows paths are sensitive to the type of slash used, the system couldn’t recognize the directory correctly. After carefully reviewing the command, I realized my error and corrected it by using the proper backward slash. This experience taught me the importance of paying close attention to syntax and how even a small detail can prevent a program or command from running successfully.When I first tried installing packages in my Google Colab notebook, I made the mistake of using the
pipcommand directly, without adding the exclamation mark (!) at the beginning. Since Colab runs in a notebook environment rather than a regular terminal, commands likepipneed to be prefixed with!so that the notebook interprets them as shell commands. Forgetting this led to errors that confused me and made me wonder what I was doing wrong. After some research, I discovered the correct syntax, for example, writing!pip install package_nameinstead of justpip install package_name. This simple realization not only solved the problem but also helped me better understand how Jupyter-based environments like Colab handle system commands differently from a traditional command-line interface.
Assignments and Assessments
Here are a few quick challenges for you to practice:
Write a program that prints the factorial of 7.
Create a JSON object representing a book (title, author, year).
Write a script that asks for a user’s name and greets them.
Demonstrate error handling for invalid user input.
Conclusion
In this article, I have been able to walk you through the core building blocks of Python programming, using simple explanations and practical code examples. I started with modules like math and datetime, showing how they extend Python’s power, then moved into explaining package management with pip and why virtual environments are essential for isolating project dependencies so different projects don’t conflict. In addition, I talked about working with JSON, explaining how data moves between Python and the outside world. I also covered file handling, highlighting different modes and how to safely read and write data, before diving into user input, where I demonstrated how to make programs interactive and reliable. Finally, I discussed error handling, emphasizing how to write programs that don’t just crash but instead guide users with clear feedback. My goal was to make Python feel less intimidating and more approachable, giving beginners a toolkit they can confidently build on.
About the author
Hi 🙋♂️ I am Franklin Obika, a reservoir engineer and data scientist passionate about solving oil and gas challenges using Excel, data analytics, and machine learning. Beyond my technical skills, I am recognized as a valuable team member, always eager to collaborate, share knowledge, and contribute to a dynamic work environment. I am committed to continuous learning and always seek new challenges where I can apply my skills to make a meaningful difference. Let's connect if you are exploring opportunities in AI, machine learning, or Excel, or if you are interested in collaborating on impactful research projects! 😊🤝
Comments
Join the discussionNo comments yet. Be the first to comment.